When I first began writing many years ago, as I related around this time last year, it was with the resolve to write a meagre page a day for the entire year. The first year came and went, and although there were more than 400 pages written then, I simply was unable to write one a day, and only through expanding the size of the page I wrote on did it translate to more than the 365 I needed. The second year was close to the first, and from the start I wrote on those marginless pages and again fell short. Every year since the first has shown the same result, sometimes only one or two short, sometimes closer to a dozen.
This year, however, I for the first time reached that tantalizing 365 and wrote a few more for the closure to the story it needed. Now, as the last few days of December slip past in preparation for the new year and the next chapter of a larger story, I await the adventures to come.
In a few short hours I will be boarding a plane to London, and a few days later to Dublin, for a yet unwritten journey to wherever the lands may take me.
Until next year, happy holidays and safe travels.
Sunday, December 29, 2013
Thursday, December 12, 2013
Leather Tooling
Ever since seeing Jake Powning's leatherworking demonstration at Oakland this October, I have started thinking about how I can take what I learned and apply it to my own work. In the past, I always thought of leatherworking as pressing (hammering) patterns and shapes into the leather rather than carving it in a sense. As my fractured finger heals, I have had little to do in the way of blades and sheaths, so I turned to something else instead.
I decided to try tooling the front of a notebook with my chasing tools, which, I learned the hard way, was more difficult than I thought it would be (considering I had to do it with the leather dry).
First I drew the pattern, a simple take on the knotwork Tree of Life. I used this drawing, sized to the front of the notebook, as a pattern which I would then use the semi-sharp edge of a creasing tool from the chasing set to trace it into the leather.

From there, I lifted the pattern off and went over the lines again to make them deeper and crisper. Although it is not what I had in mind when I started, as I originally wanted to make the cords uniformly deep instead of the two lines for the edges, I was satisfied with the hour or so it took to do.

The effect is subtle and unfortunately difficult to capture on camera, but here is the result.
Tuesday, November 19, 2013
October Skies
There are, I firmly believe, those points in everyone's life
however old or young, that serve as a clear defining point. In my youth, I had
the unfortunate reasoning to see everything for its value in resilience. Ignorance, I would call it now. I was
fascinated with the ancient worlds that we once lived in yet inexplicably
removed myself from the human aspect of it. When I travelled to Romania some
years ago, I went to extraordinary efforts to take pictures that did not have
people in them, whether the crumbling ruins of a fortress or a church
celebrating its 1,000 year anniversary. Yet later when I was perusing them I found
that they seemed hollow. How can there be culture without people? One of the
photos that lingers in my mind the most is a shepherd and his flock, migrating
across the countryside. I cannot say why it has had such a profound impact on
me, but in the years since that singular memory has remained stronger than any
others.

 |
| Nate Runals watching over the hearth furnace at Scott's Hammer In |
When I first entered into the craft of bladesmithing, I had
only the vast expanse of electronic knowledge to expose myself to, but it was
more than simply the cold reflection of an illuminated computer screen. On the
other side, there were people there who were, once, in the same place as I. From the first days of trying to absorb
everything I possibly could, I was met with warm welcome and encouragement at
both my successes and failures, something that become so disparagingly rare in
this age, especially when it is so easy for people to assume a mask of anonymity and shell of defence behind the gateways of the internet and social media.
 |
| Eli with his patternwelded saxat Fire & Brimstone |
It was at Ashokan two years ago that I first met fellow craftsmen in person, not only of blades but all sorts. The amount I learned there in the span of three days was staggering compared to the previous months on my own. More than that, I for the first time began to experience the organisation of craftsmen as something more than simply a virtual network. In the following spring, I had the good fortune to catch the close of Baltimore Knife and Sword Co.'s annual Fire and Brimstone hammer in, and then a month later Scott Roushof Big Rock Forge's hammer in up in northern Wisconsin. This year I attended Ashokan's hammer in for a second time, and through the past year of travelling I was shocked at how natural it felt to be around the men and women of similar pursuit, despite my own meagre skills.
 |
Sign hanging outside the door to the once Mad Dwarf
Workshop, now David's own Cedarlore Forge
|

 Come the first weekend in October, I was afforded an opportunity
to which I am extremely grateful. David DelaGardelle of Cedarlore Forge hosted
a small gathering in his shop in Indiana. The country there is spectacular, and
the company was the best I have shared. Although
I was unable to bring any work of my own, watching and helping in the work of some of
the great craftsmen who inspired me to stop sitting around and dreaming of smithing
and actually taking up a hammer. It was that
weekend, perhaps more than any other I have lived and may live for some time
yet, that spoke to me in ways beyond describing. The company, the shop, the
land, the pure, good natured brotherhood left me with a profound and deepened
appreciation not only for the craft, but how I viewed my own life and what I intend
to become. When I wrote on the nature of possession and inspired by my work, by my tools,
by the knowledge that either I put the time to craft my own steel, my own
hammer or forge or bow or boots, or that someone else out there did the same. I
want to be driven by my surroundings, the very walls around me, to do better,
to delve deeper into the culture of my ancestors and the process they went
through hundreds of years ago. And it is in the good company of the people I met
at Dave's that I have come to understand that there is so much beyond the
present and the self and all that there is we see and perceive. These words likely do not convey easily the
message I intend, however I left that weekend feeling enlightened in every
sense of the word.
Come the first weekend in October, I was afforded an opportunity
to which I am extremely grateful. David DelaGardelle of Cedarlore Forge hosted
a small gathering in his shop in Indiana. The country there is spectacular, and
the company was the best I have shared. Although
I was unable to bring any work of my own, watching and helping in the work of some of
the great craftsmen who inspired me to stop sitting around and dreaming of smithing
and actually taking up a hammer. It was that
weekend, perhaps more than any other I have lived and may live for some time
yet, that spoke to me in ways beyond describing. The company, the shop, the
land, the pure, good natured brotherhood left me with a profound and deepened
appreciation not only for the craft, but how I viewed my own life and what I intend
to become. When I wrote on the nature of possession and inspired by my work, by my tools,
by the knowledge that either I put the time to craft my own steel, my own
hammer or forge or bow or boots, or that someone else out there did the same. I
want to be driven by my surroundings, the very walls around me, to do better,
to delve deeper into the culture of my ancestors and the process they went
through hundreds of years ago. And it is in the good company of the people I met
at Dave's that I have come to understand that there is so much beyond the
present and the self and all that there is we see and perceive. These words likely do not convey easily the
message I intend, however I left that weekend feeling enlightened in every
sense of the word.
the materialistic
movement this age is tending towards, I only touched on the surface of something
I intend to write more on at a later time once I have deepened my own
understanding of what I see in the world around. At its core, however, I see
the world as it begins to lose its significance in the small details. I want to
be on the other side pushing back.

It was near the end of the month when I travelled to
Oakland, California for the Axe 'n Sæx hammer in hosted by Alchemy Metalworks. Since
the beginning of the year I had been looking forward to his immense gathering of
some of the most talented craftsmen and genuine people I have ever met. From the far corners of the world and near, a weekend devoted to the
furthering and understanding of the Saxon roots of the craft in all aspects
brought a long trip from one coast to the other filled with anticipation.
 |
| Host Jim Austin annealing a demo piece of koftgari |

 |
Jake Powning working on knotwork
on a sheath
|
 |
| Petr Florianek carving a piece of reindeer antler |
 |
| Jim Austin welding the eye of a Dane axe |
 |
| Niels Provos and Ric Furrer with Niels' Serpent Sword |
Again here, I look back and see the second half of the two
weekends so close together that I see them as one continuation of the other,
with the same reference and awe as when I returned from Indiana four weeks
prior. The fellowship anew and old alike renewed, the appreciation for the
skill and passion of those good men and women who, when seen together represent
one of the most gracious, inspirational, and all around upstanding group of
people I have ever known, I can only think that I started down this path for a
reason. As I continue to grow and develop my own skills and appreciation for
the world around me, I know in my heart I would still be the same naive wander I
was of my youth without a regard for what truly brings meaning to life.

Saturday, November 9, 2013
Electro-Etching
Etching patterns (not damascus) into blades/other things has long been on my list of things to try, and I finally found a moment to give it a try with mixed success. The basic process can be done a number of ways, all involving an etchant and a resist. The resist marks where the pattern will be by leaving the steel bare wherever you want to achieve depth. Everywhere else is then covered with something, ranging from vinyl stencils, toner, wax, and in this case, electrical tape. For the etchant, I used salt water and electricity.
First, I had to find something to etch. I decided it was the perfect opportunity for a blade that broke before tempering that was once destined to become a new design for a kitchen knife. After a little (a lot) or re-profiling, I came out with a passable straight razor of an atypical shape, due to the previous proportions.

I left the surface rough, around 220 grit from the belt sander. I find that the tape adheres better to a rougher surface, and the etch takes better. Covering the entire face to be etched with hardware store variety electrical tape, I proceeded to sketch a thorny knotwork pattern onto it and cut it as carefully as possible with an xacto knife. The above is the result of the first step. It is not much, more for proof of concept than anything else.
Next, I went to the recycling and pulled a bottle, cut the top off, and filled it with salt and water. Mix in the salt until it does not dissolve any more, and then add a little more. Heating it helps the process somewhat. I then gathered the remainder of my materials. At this point, I had
-Salt water
-Q-tips
-12 Volt Battery charger
-Towels

As shown above, the red (+) lead of the battery charger is clamped to the blade, and the black (-) lead is holding a salt water soaked Q-tip.

I will take a moment to talk about the battery charger. This was the biggest unknown for what I was doing. Before trying to find one, I was not entirely certain what it would look like or where I would find one. Oddly enough, they were with the 12v batteries. Specifically, the car batteries and the like for other motor operations like dirt bikes, motorcycles, and large toys. There were quite a few to choose from, and this happened to be the cheapest (at my local big box store). I would not recommend anything with automatic shutoff or 'intelligent' auto selection of voltage/current. They simply do not work as well, as the thing you are 'charging' is not a battery. Those safety precautions designed to prevent people from electrocuting themselves or burning out the starters causes it to be less effective when completing the circuit with a piece of steel. Shorting it, actually.

When it comes time to actually etch the piece, clamp the wet q-tip in the black lead and touch it to the exposed metal. Do NOT touch the lead itself to the metal, as it will spark and short and likely cause some sort of electrical fire. It is not that difficult to avoid.
Almost immediately, the salt water will begin to bubble and turn to steam, leaving the steel dark and discoloured with a slime around the tape. That is not caused by the tape melting or burning, simply part of the process. However, I would advise against breathing it in if all possible and doing this somewhere with good ventilation.

It is important to be as uniform as possible in where you contact the metal. For larger designs, always keep the q-tip moving. Re-wet as often as necessary; dry, it will not do anything. The salt water carries the current to the steel and when electrified is quite corrosive.
You may come to the point that nothing happens any longer. That is likely because either you need to use a new q-tip or just wipe off the surface of the pattern. Be careful, as it may lift the resist. I was able to run it under the kitchen sink to clean it with no issues.

The depth and detail of the pattern is determined by the amount of time you etch it. For this experiment, I etched it for a total of around 15 minutes, spreading it as evenly as possible over the entire pattern.

Then simply peel off the resist, and there is the pattern. I had tangible depth to this, which was the idea, as I still have to sand the blade and finish it. A few observations. First, the line where the blade hardened and did not was very distinct in that the softer metal was brighter. In the picture, you can almost see it in the leftmost part. In person, it is almost white. Second, the lines where the layers of tape overlap will create a small etch line that needs to be ground out. Similarly, where the pieces of tape (if you are using that) that are not held too strongly will try and lift off the steel. Just be careful not to drag the q-tip into the ends of the tape, but rather with them so you are not pushing on them.
I will continue to experiment with depth and uniformity of the etch, as well as post-etch finishing of the relief. More updates to come soon perhaps.
Saturday, October 12, 2013
Giant Mountain
Again I stepped out of the door towards the Adirondacks High Peaks region, this time towards the summit of Giant Mountain in the midst of fall foliage. Beautiful reds and oranges burn the countryside with those green pines and spruce layered on the higher slopes. I have come to learn that, in fair weather or foul, the mountains of the Adirondacks never disappoint.

The brilliant colours brings to mind an excerpt from JRR Tolkien's The Lord of the Rings which reads


The brilliant colours brings to mind an excerpt from JRR Tolkien's The Lord of the Rings which reads
“All that is gold does not glitter,
Not all those who wander are lost;
The old that is strong does not wither,
Deep roots are not reached by the frost."


Again we happened upon the cairn that mark the way for hikers along sections of the trail where there is either no clear path or the final ascension to the summit. Something about the cairn, as I wrote in the entry a few months back regarding the hike up Mt. Marcy, there is a poetic nature to the cairn that is only partially captured in photographs. What they represent, the process of their creation, and their ability to weather the mountain storms draws my curiosity in a way that few things do.


At the summit, we grilled steaks on a small propane grill and at them at the seat of the world's table.

So too at the summit I found the veins of the rock. All along the way, I saw them along the way. To me, they represent the roots of the mountain and all that gives the land its mighty strength.


This is now 2 of the 46 High Peaks.
Wednesday, September 25, 2013
Ashokan 2013
The Ashokan Center holds a yearly hammer-in, one of the oldest and best in the country. This was the first hammer-in I have ever been to, and returning this year reminded me how great it really is. Bacon, beards, and brews, not to mention the outstanding lectures and demonstrations by some of the most talented and knowledgeable people in the craft. It is, without exaggeration, one of the best weekends of the year. It was a pleasure to see faces new and old, and swing the hammer once again in good company!


 |
| Fires of the first forge lit for the weekend |


 |
| Inside the inferno |
 |
| Roman Landes all the way from Germany |


 |
| Mike Davis and the blade from his forging demo |
 |
 |
| Ric Furrer preparing a billet for welded inlay |
 |
| Mike Davis using a tattoo gun for scrimshaw |
 |
| Unicorn toad scrimshaw |
 |
| Kevin Cashen and his satirical humour |
 |
| Chiselled billet for Ric's inlay demo |
 |
| Meteorite |

Friday, September 13, 2013
Armguard Part II
Continuation of this project: Armguard Part I
This has been some time in coming, and has actually been done for about three months now, but I just got the time to process the photos and write the post for it. Without any more introduction, here we go!
 While the repousse tools I ordered came through the mail, I started making the leather backing for the brass. It was simple enough, just tracing the metal and then sketching a shape on paper to trace. As you can see, it took a few attempts to get the way I wanted it (and my old nemesis- symmetric). The underside of the leather does not matter much anyway...

Cut out and ready for the edges to be refined. I used a knife to cut it, so it was not the cleanest. As I work on a quiver now, I have found that a sharp pair of tin snips does a fantastic and clean job for the higher weight leathers.

After I had an idea of how many eyelets I would need, I marked them at an interval which I have since forgotten and used a punch set to prep the holes for the eyelets.

Here is the front of the leather with the brass on top. I will later fasten the metal to leather with home made rivets with washers on the back to keep it from tearing through.

Repousse! I did not have a pitch pot, so I instead used a small cast iron skillet filled with pitch. I ordered my tools from Saign Charlestein opened SC Studios LLC. He was very helpful and understanding of my severe lack of knowledge in this subject and worked with me to create an entry set of tools. I also ordered the California Red Pitch from him, and it worked great.
The first part was to set the piece in the pitch. I heated the pitch rocks in the oven, filling the skillet gradually to avoid trapping too much air inside. When it was all liquid and deairated, I allowed it to cool to room temperature so it could solidify. Then I heated the surface with a torch and gently pushed the metal in until it began to slightly flow over the edges. You need to be careful doing this, as it will quickly spill over the surface you are working.

To remove it, simply heat again and pull out. There will inevitably be pitch left on the metal, but it can be cleaned off with acetone. On to the next side. The way pitch works, you can hammer specific parts without it deforming the entire area around it, allowing you to make detailed designs and textures (which I am a long way from doing).

All I did was help define the lines more clearly and the spaces between them. Nothing fancy.

Now I began marking the holes for the rivets. I used a regular broad headed nail to punch through the brass in pre determined locations. The only problem with this is you will need to de-bur the other side.

To the left of the above picture is a piece of stainless steel rod that I will make the rivets out of. The reason for this as opposed to a regular steel bar is it will be in frequent contact with my arm, and as arms (or any skin for that matter) does when confined to warm, uncirculated places, it sweats. And sweat has the incredible tendency to rust steel almost immediately.

Before I started riveting, I did a few experimentations with patina. I wanted a heavily aged look with higher contrast from the previous image. To do this, I dipped the ends back in the pitch bowl, removed it and wiped it mostly clean, and then burned the remainder of the pitch onto the metal. After that, I used a home made mixture of linseed oil and charcoal ash to darken it, then burnishing it into the metal. After that, I sanded the highlights to produce the above effect.

Here is what it looks like on the leather again. Much better than before (I think).

Compared to the original design. I have also marked and punched the holes for the rivets into the leather.

Sizing the holes and washers. All seems to be going well. This is when I measured how much of the rod I would need for each rivet. As a general rule, I leave the diameter of the rod in length hanging over each side of the thing being riveted. This allows for a proportionate head to be hammered on each side.

The riveting block I made for the folding knife a while back. It is a little worse for wear, but it still works. The proper size hole is filled mostly with a piece of unheaded rod, until the length of the unheaded rivet fits in the block such that the necessary length to head it protrudes from the top. This way, I can hammer a head onto one end while the remainder stays straight and undeformed.


Back to leatherworking. I have no idea what this thing is, but I found it in the workshop and it made a great edge beveler. All I did was sand the bottom side flat and have at it. It cuts a fine ribbon of leather from the corner of the edge, making it nice and round. The sharper the edges at the corner of the fork, the easier it will cut.

Using that same piece of paper that I traced onto the leather, I sketched a simple design to tool into it. I will eventually build a lightbox, as my nemesis Symmetry held me up until I folded it in half and traced it on the window. I also marked the rivet and eyelet holes to avoid running into them.

To tool the leather, I dampened it slightly, allowed to dry until it was nearly its original shade of tan, and then used the repousse tools to press the lines in. At first I hammered, but found that I did not need to and that by simply pressing down firmly and sliding the tool across the line, it created a cleaner, more evenly deepened mark. Also, the friction darkened the recesses a little (a lot).

Silver for the tooling...

...and brown stain for the rest. This complimented the aged feel of the brass, and by covering over the silver and wiping it around a little before it dried made it more random and marbled. also, applying the stain in random patterns helps with the agedness.

After much research and no results, I decided I would make my own sealant. There are many commercial leather sealers out there, but none of them were locally available. Instead of ordering it online, I went the home made route (theme?). In the jar are the following:
-1.5 parts pure beeswax
-1.5 parts paraffin wax
-1 part or thereabouts of olive oil
This mixture, double boiled and homogenized, will protect the leather from moisture and keep it from cracking. And I suppose it smells nice too, if you are into beeswax.

Applying the mixture, after it solidified, was simple enough. All I did was heat the leather with a hair dryer and wipe it on with a paper towel. I found it difficult to use too much, although when you can see the yellow-white colour on the leather you probably reached the threshold.

Leather, brass, and a rivet all together. This was to give me a feel for what it would look like. At this stage, I also used a wheel to clean up the edges of the leather. What you need is something with the convex side of a circle (outside edge) and a U shaped groove along that edge. Think a pulley wheel but smaller. I used a wheel from the K-NEX toys and it did a great job. Dampen the leather slightly (I did this before sealing) and firmly slide the groove of the wheel along the edge of the leather. It makes it nice and smooth and keeps it from pulling and expanding later, not to mention looks much better.

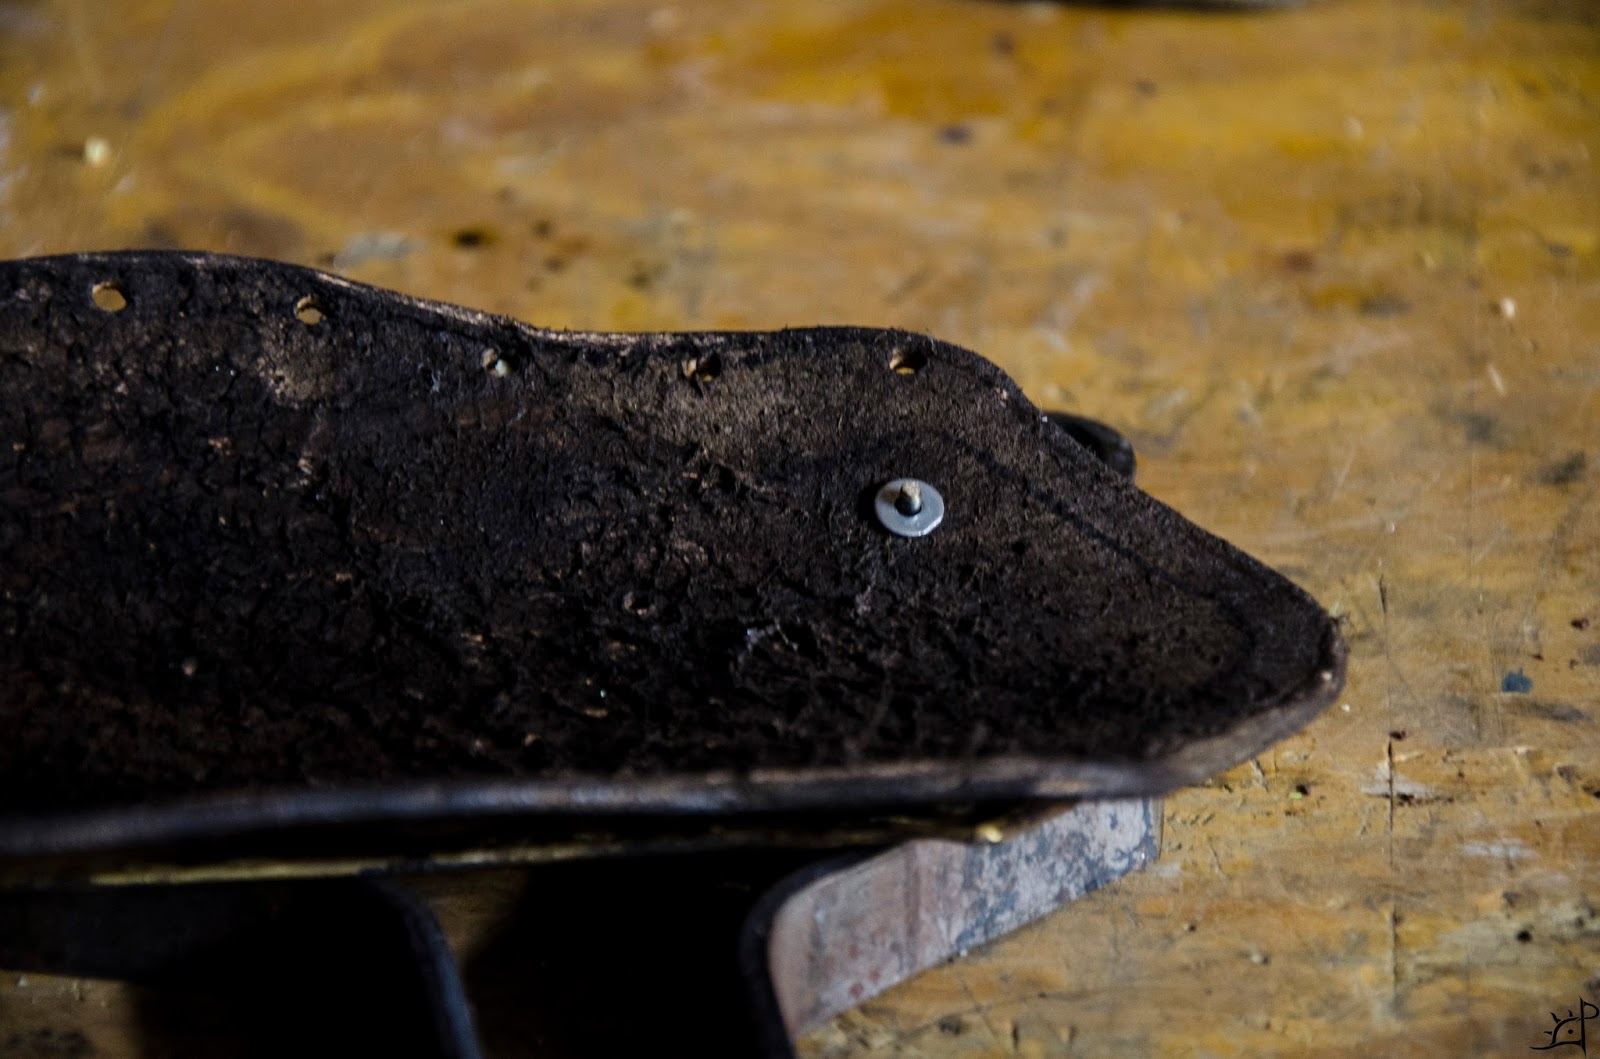
Hammering the first rivet. Note that the washer is on the arm side of the armguard. If you do not use something between the head of the rivet and leather, it will pull through far sooner than you want it to. Especially if you never want it to.

That same rivet hammered down. There is no need to kill it, just enough to make it flat and secure.

All the rivets done. Some of the corners were tricky, as I did not want to damage the brass in the process. Finding a good position to hammer on is more difficult than you think.

The final step is to put in the eyelets. I found these on clearance for $.99 per hundred. They are not essential, but make the armguard look much more finished, not to mention save wear on the leather and the cord running through the holes.

Finished armguard. I hope you enjoyed!


This has been some time in coming, and has actually been done for about three months now, but I just got the time to process the photos and write the post for it. Without any more introduction, here we go!


Cut out and ready for the edges to be refined. I used a knife to cut it, so it was not the cleanest. As I work on a quiver now, I have found that a sharp pair of tin snips does a fantastic and clean job for the higher weight leathers.

After I had an idea of how many eyelets I would need, I marked them at an interval which I have since forgotten and used a punch set to prep the holes for the eyelets.

Here is the front of the leather with the brass on top. I will later fasten the metal to leather with home made rivets with washers on the back to keep it from tearing through.

Repousse! I did not have a pitch pot, so I instead used a small cast iron skillet filled with pitch. I ordered my tools from Saign Charlestein opened SC Studios LLC. He was very helpful and understanding of my severe lack of knowledge in this subject and worked with me to create an entry set of tools. I also ordered the California Red Pitch from him, and it worked great.
The first part was to set the piece in the pitch. I heated the pitch rocks in the oven, filling the skillet gradually to avoid trapping too much air inside. When it was all liquid and deairated, I allowed it to cool to room temperature so it could solidify. Then I heated the surface with a torch and gently pushed the metal in until it began to slightly flow over the edges. You need to be careful doing this, as it will quickly spill over the surface you are working.

To remove it, simply heat again and pull out. There will inevitably be pitch left on the metal, but it can be cleaned off with acetone. On to the next side. The way pitch works, you can hammer specific parts without it deforming the entire area around it, allowing you to make detailed designs and textures (which I am a long way from doing).

All I did was help define the lines more clearly and the spaces between them. Nothing fancy.

Now I began marking the holes for the rivets. I used a regular broad headed nail to punch through the brass in pre determined locations. The only problem with this is you will need to de-bur the other side.

To the left of the above picture is a piece of stainless steel rod that I will make the rivets out of. The reason for this as opposed to a regular steel bar is it will be in frequent contact with my arm, and as arms (or any skin for that matter) does when confined to warm, uncirculated places, it sweats. And sweat has the incredible tendency to rust steel almost immediately.

Before I started riveting, I did a few experimentations with patina. I wanted a heavily aged look with higher contrast from the previous image. To do this, I dipped the ends back in the pitch bowl, removed it and wiped it mostly clean, and then burned the remainder of the pitch onto the metal. After that, I used a home made mixture of linseed oil and charcoal ash to darken it, then burnishing it into the metal. After that, I sanded the highlights to produce the above effect.

Here is what it looks like on the leather again. Much better than before (I think).

Compared to the original design. I have also marked and punched the holes for the rivets into the leather.

Sizing the holes and washers. All seems to be going well. This is when I measured how much of the rod I would need for each rivet. As a general rule, I leave the diameter of the rod in length hanging over each side of the thing being riveted. This allows for a proportionate head to be hammered on each side.

The riveting block I made for the folding knife a while back. It is a little worse for wear, but it still works. The proper size hole is filled mostly with a piece of unheaded rod, until the length of the unheaded rivet fits in the block such that the necessary length to head it protrudes from the top. This way, I can hammer a head onto one end while the remainder stays straight and undeformed.

After heading all the rivets, I put them in the brass to see what it looks like. See? it is nice using a nail to punch the holes because it pushes the edges down enough that the head of the rivet sits flat with the piece.

Back to leatherworking. I have no idea what this thing is, but I found it in the workshop and it made a great edge beveler. All I did was sand the bottom side flat and have at it. It cuts a fine ribbon of leather from the corner of the edge, making it nice and round. The sharper the edges at the corner of the fork, the easier it will cut.

Using that same piece of paper that I traced onto the leather, I sketched a simple design to tool into it. I will eventually build a lightbox, as my nemesis Symmetry held me up until I folded it in half and traced it on the window. I also marked the rivet and eyelet holes to avoid running into them.

To tool the leather, I dampened it slightly, allowed to dry until it was nearly its original shade of tan, and then used the repousse tools to press the lines in. At first I hammered, but found that I did not need to and that by simply pressing down firmly and sliding the tool across the line, it created a cleaner, more evenly deepened mark. Also, the friction darkened the recesses a little (a lot).

Silver for the tooling...

...and brown stain for the rest. This complimented the aged feel of the brass, and by covering over the silver and wiping it around a little before it dried made it more random and marbled. also, applying the stain in random patterns helps with the agedness.

After much research and no results, I decided I would make my own sealant. There are many commercial leather sealers out there, but none of them were locally available. Instead of ordering it online, I went the home made route (theme?). In the jar are the following:
-1.5 parts pure beeswax
-1.5 parts paraffin wax
-1 part or thereabouts of olive oil
This mixture, double boiled and homogenized, will protect the leather from moisture and keep it from cracking. And I suppose it smells nice too, if you are into beeswax.

Applying the mixture, after it solidified, was simple enough. All I did was heat the leather with a hair dryer and wipe it on with a paper towel. I found it difficult to use too much, although when you can see the yellow-white colour on the leather you probably reached the threshold.

Leather, brass, and a rivet all together. This was to give me a feel for what it would look like. At this stage, I also used a wheel to clean up the edges of the leather. What you need is something with the convex side of a circle (outside edge) and a U shaped groove along that edge. Think a pulley wheel but smaller. I used a wheel from the K-NEX toys and it did a great job. Dampen the leather slightly (I did this before sealing) and firmly slide the groove of the wheel along the edge of the leather. It makes it nice and smooth and keeps it from pulling and expanding later, not to mention looks much better.
Hammering the first rivet. Note that the washer is on the arm side of the armguard. If you do not use something between the head of the rivet and leather, it will pull through far sooner than you want it to. Especially if you never want it to.

That same rivet hammered down. There is no need to kill it, just enough to make it flat and secure.

All the rivets done. Some of the corners were tricky, as I did not want to damage the brass in the process. Finding a good position to hammer on is more difficult than you think.

The final step is to put in the eyelets. I found these on clearance for $.99 per hundred. They are not essential, but make the armguard look much more finished, not to mention save wear on the leather and the cord running through the holes.

Finished armguard. I hope you enjoyed!


Subscribe to:
Posts (Atom)