News and Announcements

Interested in learning about blacksmithing? Read this!

--News & Announcements--
Upcoming projects:
Building a Frame Saw
Forging a Copper Kettle
Making a pair of leather work boots
Forging and Fletching a Bodkin
Flocking a drawer interior

Monday, December 5, 2016

Wayfaerer

"It doesn't matter how many times you leave, it will always hurt to come back and remember what you once had and who you once were. Then it will hurt just as much to leave again, and so it goes over and over again. Once you've started to leave, you will run your whole life."
-Charlotte Eriksson


The wayfærer wanders, but it is neither towards nor away from anywhere that lies at the end of the path. The wanderer finds destination along an unplanned road, some place which satisfies the longing of a heart without a home, however long it stays. There is a journey, but that journey must also come to an end. To the wayfærer, however, it is the passage itself which becomes the destination, and only in the depths of foreign sight and sensation, the thrill of insecurity and strangeness, the lingering question of what really waits just beyond your sight, will there be something to fill in the holes which have been slowly worn away.


Entrenched in the comfort and routine of society, it is dangerously easy to forget how wild and unforgiving the world was. Of what lies out there, waiting to be seen, to be explored, to be experienced. By living off of what you can carry on your back, surviving by instinct and endurance, relying upon your own ability to solve problems, a great deal of that unbidden life returns. Too often, it feels as though the advances we make are merely the illusion of progress hiding something darker. Now and again, the whisper becomes a howl, and there is no choice but to remember what lies beyond the shrinking boundaries of what our personal world has become.


When you need to break through a frozen waterfall with an axe to find water, or hike by the light of the moon across 11,000 feet of elevation and 100 degree temperature swings, modern living suddenly finds a new appreciation. Too often I hear someone proclaim, however thinly veiled behind jest, that it is madness to search out what awaits us in the wilderness. To many, there is no appeal, no desire, no willingness to tolerate the burden of leaving behind the life that has been built around us. Yet to them, I question what it truly means to live. We have come to a time where more is accessable, at any moment, than any other period in history. And yet still we experience from a distance, choosing the parts which are convenient and leaving behind all that makes it real. Without hardship, all that which is beautiful in the world has lost its meaning.


I was, looking back, chasing after that sensation awakened by the finality of true isolation. Atop the peaks, the world lay beneath me with a perspective I have never known. Whether I embarked with that purpose, I instead found another, one which evades even the most relentless pursuit and is often found in search of something else.


Enshrouded by the endless breaks of rock and ice, ridgelines standing thousands of feet around you as impassable as those we struggle to leave behind, there comes a quiet over the land. Echoes of the builders linger, their work remaining long after their hands depart. With the onset of winter, in areas  the snow covered over the trail so heavily that the only place to step was an inch from the sheer face of a cliff plunging half a mile down. Alone, you must be ready to face that which you can never prepare for. It is that sensation which cannot be confined to words, an opening to a doorway that, once ajar, cannot be closed again.


It is not that I found myself simply leaving something behind, nor that I was seeking out something in its stead. Rather, there upon the heights I was looking for the sort of transformation that comes about by its own right, that cannot be forced or demanded or stolen out of the quiet life.


Too often, we permit our work to define our identity rather than affording our identity the opportunity to define our work. Our labours become our nature rather than our nature shaping what we must overcome. Whoever we are, we are all in pursuit of something. For the wayfærer, it is seeking out the road itself. Towards no destination beyond the changing face of what lies around us. To wander into those far corners of the world yet leave them before the sense of wonder which brought us there is lost.


A better burden 
may no man bear 
For wanderings wide than wisdom; 
It is better than wealth
on unknown ways, 
And in grief a refuge it gives.

-The Hávamál

Sunday, November 20, 2016

Leather Toolbag Preservation


Recently, I was able to begin working in a traditional blacksmith's shop on one of California's state parks, and part of the involvement as a demonstrator/educator means I must also wear traditional ~1860s era clothing. Since there are a good many tools which I transport to and from the shop, I decided to make a leather toolbag. Cut and stitched from a single half hide of leather with forged buckles, the bag promised a great deal of use but needed a bit of treatment and preservation from the unstained vegetable tanned hide which it came from.


To begin, I made a vinegaroon solution. In essence, it is an acidic ferrous solution which reacts with the tannins in the leather. In addition to leather, a variety of other materials react with a similar darkening when exposed to the iron, including several species of hardwood. This solution turns the leather from its normal tan brown to a dark grey/blue and then black.


Making vinegaroon is extremely easy in its simplest form. I took a handful of metal dust from the belt sander and poured white vinegar over it. As the iron dissolves into the vinegar, it forms what I later used. Shavings from a file or steel wool, anything iron or non-stainless steel with a good amount of surface area will work.


For around three days, the vinegar-iron solution sat on the counter and worked its breakdown of the metal dust. A funky skin began to form on the surface of the vinegar as a result of the oxidation and lifting out of impurities trapped in the metal dust, likely wood and abrasive particulate. That scum was skimmed off the top and disposed of. Once no more of the metal dissolved in the vinegar, it was time to strain the mixture. This is not the first vinegaroon I have made, but it was by far the strongest. I suspect that the more saturated the solution, the stronger it acts. Diluting it with additional vinegar would have left the leather surface a paler blue grey rather than the dark black it ultimately became.


Trying to use a coffee filter to strain the mix, the progress was so slow that I eventually gave up on that and used a sponge to absorb the liquid, leaving at the bottom of the original container a layer of particulate at the bottom where the metal and other stuff did not dissolve or rise to the surface.


In the end, I was left with a good amount of vinegaroon. The liquid is not very turbid and should not separate after sitting for a time.


Here is the bag after constructing it, before applying the vinegaroon. I would recommend that, in most leatherworking endeavours, that the entire surface be treated (or at the least dyed) before assembly. Since I did not have a pattern or template or really even a general design idea before beginning the stitching, I decided not to treat it until after I was finished. As a result, the deeper cracks of seams are unfinished and present a slight feel of mediocrity to the approach, but there is nothing I can do about it now.


To apply the vinegaroon, I usually use a cutting of sponge. Rags will probably work just as well if not better for large uninterrupted pieces, but I find that this does a banger job at getting into tight spaces.


Almost immediately after contact with the vinegaroon, the tannins react and the leather stains black. That small patch was one quick wipe, the photo taken only a second or two after application.


After one coat, the surface is fairly representative of the final shade. I went back for a second pass to even out any spots and catch places I may not have gotten thoroughly the first time, and addressing the hard to reach seams. It did manage to darken the shade just slightly, but the deeper black colour comes later when the surface is treated with oils and wax.


Because the process is chemical and not merely the absorption of stain or dye, the leather's colour is a bit more durable and better able to highlight the natural grain. And it is a simple process that does not require anything dangerous, is easy to do, and could have been done for hundreds of years to the same effect.


Now that the leather is dyed, it's onto the preservation side. For this project, I modified a recipe I came up with a while back in the effort of making the treatment a little easier to apply. Before, there was so much wax in the mixture that it was too solid at room temperature to apply. For this round, I used a mixture of

-Neatsfoot Oil
-Olive Oil
-Beeswax

The actual proportions varied a bit, but trying to compensate for the beeswax as it solidifies. Really it's trial and error to get the consistency you want. In the end I had something like 75% oil : 25% wax.


Rigging up a little double boiler, I started by melting the wax. This took a little while, so in the meantime, I began the process by giving the entire surface a coat of the neatsfoot oil.


Wiped on with a rag, the oil absorbed fairly quickly into the leather, which is what I am after. Having that deeper oil penetration will help later with it drying out and becoming brittle. Since the wax is a bit more solid, it tends to remain closer to the surface and keeps the intermixed oils there with it. Also, you can see that even that little bit of neatsfoot oil significantly darkens the shade left by the vinegaroon.


Once that oil was applied, the wax melted and I was able to mix in the olive and neatsfoot oil. While it was still hot, I gave everything as many coats as I could without having a visible waxy accumulation. Had I a heat gun, I would have used that to help the leather absorb the mixture better. Even still, the hot mixture went on easily and with a bit of buffing resulted in a reasonably effective surface penetration.

That's about all I did to treat the leather for the time being. When I see it beginning to show signs of wear or dryness, I will go back with the oil/wax mixture and seal it up again. With the wax, the leather tends to have a decent moisture barrier, and from the oil it stays supple. Together, they give a naturally durable surface that will hopefully withstand the abuse of a 150 year old shop.


Wednesday, October 12, 2016

The Luthier: Part XIV- Conclusion

It has been a few long months now since there has been any update on this project. For several of those, the fret markers were on order, but now that they have arrived, it's finally time to bring this project to a close. I posted the first part of this process a year ago last week, although the work began even about a month before that. For all it has taught me, I will be sorry for the experience to finally be over. Going into the build, I had no knowledge of building instruments, how to play guitars, anything about the design, construction, or acoustics, or even really how to use many of the tools which became common to my hands along the way. While there are several things I would have done differently now that I know better, the result has been satisfying for the expectation I had before I began.


This final post will cover my approach to the fret markers' inlay and a few final photos of the finished piece. Although nothing terribly difficult or exciting, it would be a shame to omit anything at this point. By now, it has been so long that I do not quite remember what they are made of, but it is of some natural shell material as far as I know. They have a slight iridescence to them when they catch the light just so, and serve as a nice contrast to the ebony of the fretboard. Certainly, they are a step above the bits of masking tape I had used in the interim.


First, I sorted the markers by size and roundness. I need seven of the lot, and there were only eight that were within a tolerable range of the 3mm holes drilled to inset them into. 


And here I'm referencing the drilled diameter a final time. It is within 3/100mm of the markers I set aside, which is close enough for me.


Next up, I set the bit with a depth stop. Although I tried to find a flat bottomed bit of this size, the points are spaded just enough that the holes will require a little finish work. So, I used the outer edge as a reference for how deep to drill, then set a collar on the shaft to act as a mechanical stop when the proper depth is achieved. I decided to use the lowest drilled depth as the set height because I do not want to have the markers inset below the surface of the fretboard by any amount. This way, I can slowly flatten the bottom to a depth that perfectly accepts the slight variance in height of the markers.


On a scrap bit of wood, I drilled a test hole to see if the stop needed any adjustment and get a general feel for the process. Because I am using a mechanical drill, there is little danger of over drilling or burning  a ring into the wood from friction of the collar.


Close, but still a little shallow. The marker sits about 1/5mm proud of the surface, which is perfect. The bottom of the hole is conical, so it is very easy to pare away small amounts of the high points until everything sits flush.


Now onto the actual fretboard. This was an extremely nerve wracking process, as any mistake here is on quite literally the last step in the process and perhaps the most visible and most difficult to correct. More, the location of the markers is directly over the truss rod, so there is a chance of catastrophic failure in the neck if the tension slips somewhere along the way.

To place the markers, I measured the distance between the two flanking frets and halved it, using the calipers to scribe a centreline  off of each fret to double check centre. From there, I did the same thing but across the width of the neck to ensure it was in the exact middle. For each of the markers, the dimensions were different, because the fret spacing changes as does the width of the neck.


And here is the moment of truth.


Once drilled, I chose a specific marker to pair with the hole. Changing it later would result in imperfections in the fit, as they are all slightly different. Using the smallest chisel I have, I slowly cut away a flat platform for the marker to rest on.


Leaving it there temporarily so as to keep track of which marker goes to which hole, I moved onto the next, then repeated the process for the 6 remaining holes.

On the 12th fret, I placed a double marker to signify the octave fret. Spacing them was a bit of trial and error, adjusting by a few fractions of a millimetre until the size of the markers balanced the width of the neck and the spacing between them.


Once all seven holes were drilled and cleaned, I used a small amount of the same hard PVA glue to hold them in place.


In the above picture, the 7th marker placed two below the 12th fret pair was not yet in place, as the frets became too close together for the drill collar to work properly. After the others were affixed, I went back and carefully did it freehand.


A day later once the glue cured, it's time to begin cleaning the ebony of all the marks left behind by the inlay. In the end, I only went to 600#, as the grain of the ebony is porous enough that the 1500# made no difference.


Using a variety of hard sanding blocks, I sanded between each of the frets until satisfied with that particular grit, then moved on to the next.


A few of the markers had slight areas of concern that needed to be addressed, whether proud or recessed by a hair's width, so the rough grits helped speed up the process significantly. In the end, everything came out dead smooth.


The next step was to re-string the thing and finalise the placement of the bridge. This dramatically effects the tuning when playing anything other than a completely open chord. The bridge acts as a constraint for harmonic length of each string, so it being forward or backward of where it is supposed to be, the pitch will be either sharp or flat when playing off any of the frets.


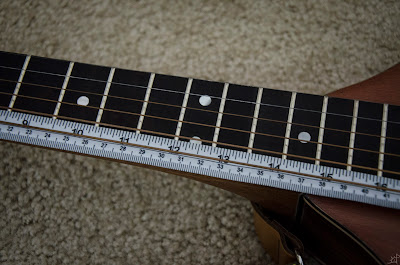
Fortunately, it is a fairly simple process to figure out. The short of it is, the 12th fret needs to be half way between the nut (neck) and bridge (body). Put another way, the length of the strings needs to be twice as long as it is from the nut (neck) to the 12th fret. 


After a few slight adjustments, it's all set. If I come back later and install a set of pickups (some technical challenges involved that may prohibit it), I will mark a line on the body itself to ensure that the harmonic length is exact and easily repeated when the bridge is removed and replaced.

And that's it. A year is both an incredibly long time and incredibly short, considering the constraints of where this project was born.

This is the first real time I have worked closely with wood, the tools, and the skills that draw the two together. As is likely evident throughout the 13 other posts of this project, there is much that I do not know, much that I have learned, and much that I will be able to use going forward. This instrument, although I largely have no idea how to play it, represents something of a great step towards a direction that holds a profound personal meaning. Perhaps one day I will return to world of the luthier, in either to create similar instruments or others that I know little about beyond the allure of their sound and their past. And until then, it's time to learn the other side of this craft and make music.