News and Announcements

Interested in learning about blacksmithing? Read this!

--News & Announcements--
Upcoming projects:
Building a Frame Saw
Forging a Copper Kettle
Making a pair of leather work boots
Forging and Fletching a Bodkin
Flocking a drawer interior

Friday, March 8, 2013

Otherworld


As the day looms nearer for  casting the fittings of a long project, the time finally came to explore this strange and foreign art. After seeing Jim Kelso's presentation on Japanese water casting last fall, this has been something of a curiosity and desire to learn more of. Subtle interactions between alloyed copper and a host of plants and compounds produce some of the most beautiful works of art I have ever seen, not to mention the delicate engraving and inlay coupled with their natural lustre.

Such pieces are far beyond my level of skill and understanding, not to mention equipment to produce. As such, it is back to the most basic principle I must turn. For the piece, a Claidheamh Mòr, the fittings will be cast   from recycled brass ammunition casings. To practise the refinery techniques and to learn more about the process, I first had to gather the necessary materials.

First and foremost, I needed a crucible. Instead of ordering one, I decided to recycle some of the old and forgotten bits lying around the shop. In a shadowed shelf, I came across a collection of two dozen or so industrial gas cylinder covers used to protect the valves in shipping. Of course, those tanks to which they belonged are long gone, and they happen to be about the perfect size.


I cut the cap midway across the circular hole. For one, that brings it to the perfect height to fit in my small propane forge, and for another it allows the top edge to be folded down as a lip to guide the molten metal. This picture is deceiving, as the vice did not hold it there well enough to use the chop saw. Instead, I was forced to use a compressed air cut off disk and manually separate the two pieces. This took about half an hour, but came out clean enough.


With the two halves, I discarded the threaded end for use in another project somewhere in the distant future, and kept the now crucible shaped top. Because there are about thirty layers of paint covering the outside, I had to sand them off before firing it. Similarly, the rust accumulation on the inside was taken care of by hand. I have heard that a layer of rust on the inside of an iron/steel crucible will help prevent the casting metal from sticking, but I saw no practical difference, although I have here the wrong kind of rust.


Because the bottom is fairly rounded, I had to forge it flat. For one, it would not fit in the forge as it was, and for another it was largely unstable. While I hammered, I noticed that there is a welded plug in the crown, which I had to be careful not to over fatigue.


Flattened to the point of relative stability, I moved onto roll down the top edge. This was a tricky operation that involved using the largest bench vice I have and a great deal of effort bending it. Hammering alone proved futile, at least until it was bent enough that I could hit it down and to the side, forcing the brunt of the energy into the anvil instead of straight down into nothing. Another half an hour or so and it was ready for a test firing.
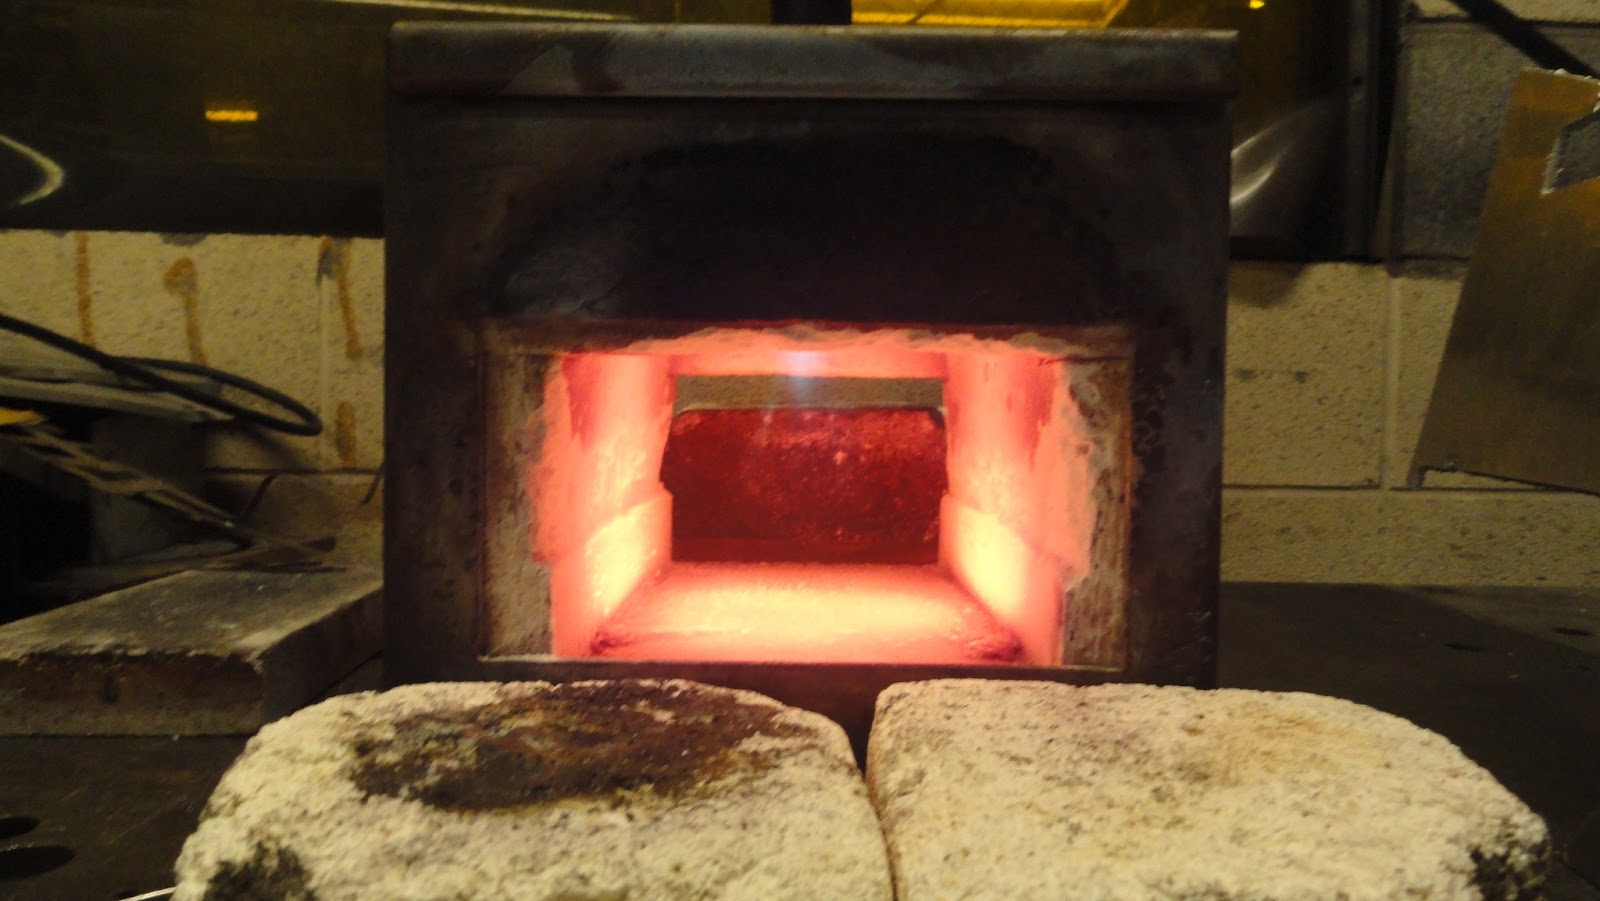

Typically, there is another brick lining the floor of the forge, which is hiding in the left side of the above picture. That extra inch, however, made the crucible too tall to fit inside. Since I am not doing any welding, the danger of the insulation being eaten away instantaneously is fairly small. Later on, I managed to spill some aluminium on the floor, but it rolled around and eventually cooled to no ill effects. One thing most notable about running the forge this way is that the chamber comes up to heat almost immediately. The brick absorbs vast amounts of energy in comparison, and takes anywhere from ten to thirty minutes to come to a steady state. The picture above was after about thirty seconds.


Lastly, I prepared a bucket of water to pour the casting into. Traditionally, I would use a cloth, but I only had paper towels on hand so I used those instead. With a bit of wire, I fastened the towels around a cutting of pipe and left a little bit of slack in the surface to make it concave. The idea is, or so I understand, to pour the liquefied metal down through the water and onto the cloth. The water cools the metal enough to prevent the cloth from burning, but not so much that it solidifies before forming a nice round ingot. Due to my inexperience, I only managed to get two small round ingots out of the day. The rest turned into some strange and interesting shapes. This was due, I suspect, to the level of water. I had the cloth too low, so the metal cooled too much and piled up on itself.


The first smelt was of four spent casings in the crucible for proof of concept. With the crudely fashioned set of wire tongs, I slid the lot of it into the forge and let sit. At first, I was weary that it would not get hot enough to melt, but a few minutes later I had a pool of yellowy metal beaded in the bottom of the crucible.


This is the result. Not much, but enough. Left in the crucible is about half this in slag. Having sat around for their fair share of years, the casings were extremely dirty and somewhat corroded. A major loss it was not, and there will certainly be more when I do a larger consolidation, but this was worth the effort. Here, the brass is far more pure than before, and can be re-cast into the hilt components without worrying about the quality of casting from a metallurgical standpoint.

With one attempt under my belt, I decided to dive right in. I had a sheet of scrap aluminium that had been laser cut into many things, leaving behind a gnarled old bit of unusable material. Instead of discarding it or recycling it, I decided to do my own recycling on it. In the coming days, I hope to cast it into something useful, but for now it is merely practise.


First, I aired on the side of caution and cut off only a few bits from the sheet and had at it. Like a dream, it melted quickly and evenly, leaving a fat ball of silvery metal in the crucible. After fitting the tongs around it and carefully pouring into the water, the result was promising.


Despite the strange shape, it was the second best of the day. This augmented shape is again likely because I had too much water in the bucket, although I am not certain. Perhaps it is an inherent property of aluminium. Soon, I will melt copper and not the differences. As best I can tell, this reacted in a very similar manner to the brass.

After this, I continued to cut away at the sheet and pour similar sized ingots until I decided to really push the limits of the forge, crucible, and bucket. Along with the above ingot and the other three I cast, I cut up the remaining aluminium and dropped it in the fire. In retrospect, this was far from a good idea, as it eventually overflowed and spilled on the forge floor, but it was worth the result.

Far from useful and consolidated, the product was an alien world of bubbles and bridges shining through the water back at me. So much metal poured into the bucket that the water inside began to boil, giving off plumes of steam and shimmering waves of heat distorted in the iridescent shop light. When last the surface became still, this is what I saw.


Thursday, February 21, 2013

Wings of Copper and Nickel


Folding knives, because of their moving parts and intricacies, have always been a daunting challenge after making solely fixed blade, full tang knives. Several months back, a disparaging amount of time having passed between then and now, I began to design a small folding knife for a friend preparing for deployment. At the time, I thought it would be simpler and easier than when I actually began to delve into the operation.


The original design involved a side spring locking mechanism as might be found in commercially available pocket knives. My reasoning for this approach was that it is simpler (in theory) than a lock that slid into place at the spine near the hinge or a thumb knob lock to prevent it from opening past 180 degrees.

Traced from the pattern onto a sheet of aluminium, I cut the pieces to be used as scales in the frame rather than steel due to the blade's constant exposure to the salty air of the oceans. With the pair as a template, another piece cut into the same shape, this time of 15n20 steel for the spring.


With a combination of files and the belt sander, all three matched near perfectly and it was time to move onto forging the blade. While I could have continued with finishing these pieces, I decided to wait until I had the blade forged and heat treated before getting carried away. The blade is, after all, the most defining piece for me to make, and I find it easier to cut new scales rather than going through all the trouble of forging and finishing a new blade to fit these if the first one is slightly askew.


From a piece of 15n20, I began to draw out the profile. However, this particular piece of stock was too thin for the final design, so I had to reduce the width to compensate. Not a difficult operation, but careful none the less to ensure flatness and no twisting with a dished anvil face.


With a somewhat uniformly shaped bar, I curved it along the length so I could draw the edge with a bevel to straighten it back out. I prefer to forge in bevels rather than grind them for the simple reason I enjoy the hammer and fire over the whirr of a motor even if it takes longer in the end.

Tip formed and slight upset along the edge to define where the blade ends, this is about all I was able to do with the hammer.


Cut free of its parent stock, the blade takes a few minutes with a file to clean the corner and define where the edge ends. This is the first point where I made a fatal mistake. I should have forged the thumb piece longer, so it protrudes past the bottom of the handle while closed. As it is here, it is useless. In later steps, I will remove it entirely.


Marks to find the centre for the hinge allow me to drill the holes more precisely than by winging it (something I do all too often). Instead of using a drill size for the final pin diameter, I kept it small for the simple reason of not having the physical pin yet. While I could have drilled it to .25" or some such dimension, I know from experience that this is a bad idea. So, I left it this small and used a nail for holding it together temporarily.

This, however, is when I decided I did not like where the project was headed, so I scrapped the design realizing I do not have the proper tools to finish it as I intended, and that the dull aluminium scales are unattractive and boring.

So, I returned to an old favourite. Mokume-gane.


The intent was to use a piece of scrap damascus for the blade and newly forged mokume for the scales. This lasted only as long as it took to walk outside and feel how cold it got overnight. Fortunately, I had forged the mokume the day prior, and instead of waiting around for the weather to turn, I decided to use the old blade.


Redesigned, I intended for there to be a layer of pure copper on either side of the spring, which now sits in the spine of the handle, and brass spacers on the non-hinge end. The hinge itself will have a nylon bushing and similar washers on either side of the blade. Or so was the plan...


First came construction of the spring. This was an experience in itself, resulting in a little improvisation. At first I cut the spring too long, so I shortened it on the belt sander. Now it was the wrong shape, so I bent it over a small rail road track anvil until it matched the scales better. And, of course, it was too short. Instead of cutting a new piece, which began as the original side opening spring blank, I realized that I could simply draw it out with a hammer. If ever there is a way to recycle old materials instead of wasting new, I do my best to use them. Here, it worked out well enough, and in the end I do not think it would have been any better to start the spring over. In fact, by drawing it out in length I also made it slightly thicker, which was for the better.

Those little brass pieces two pictures up came next, as well as the holes in the blade and scales. Those were sized for the bushing I picked up in a rather spontaneous hardware store trip. By this point, it has been several months (January) since I first began, and I did not want to delay by ordering something online with the possibility of getting it wrong, having to order new parts, etc. So, I brought the scales and blade with me and sized them on the spot.

With said hardware, a collection of the smallest screws I could find, which were still far too large in retrospect, nylon bushings and washers, lock washers, nuts, bolts for the hinge, amongst other things. Spring cut, I drilled holes in it and the brass to match holes in the scales where the back end would be held together by two screws.


My intent was to use the relative hardness of the screws compared to the soft copper and nickel of the scales and brass of the spacers to my advantage. By drilling an undersized hole, I could thread them by screwing the screw into it with a little work. What I did not know at the time is how weak the screws actually are. Everything was going fine and well, until I felt a dramatic change in resistance. For those of you who do not know about material science, I will explain the phenomena. Metals (and everything else for that matter) can experience a certain amount of stress and remain physically unchanged. Imagine a tensile spring. Pull it apart a few centimetres and release. It characteristically springs back into its relaxed shape. Now, pull it ten times as far, and when released it is still a little deformed by the process because its elastic limit was exceeded, and now it will return only to that point rather than fully compressed. Next, pull it and do not let go until it is fully straightened and farther. The fibres of the spring themselves are beginning to separate, and if you do not stop soon, it will break into pieces.

Apply a similar idea to the head of a screw, the weakest part. It can take only so much, and repeated pushing of its elastic limit will eventually find the yield point, and not long after, failure. In my case, the steel failed at exactly the wrong time. I felt the resistance spike and then fall rapidly, and I knew the battle was lost. As I tried to reverse and unscrew it from the newly threaded holes, the head of the screw sheared right off, connecting the two scales, the unhardened spring, and one of the two brass spacers.

Fortunately, I was able to hold the bottom scale and rotate the rest of the pieces around until they came clean, but that left the screw embedded in that bottom scale. As I took a pair of pliers to it and tried to manually twist it free, the same thing happened again. Now only the barest millimetre of screw remained out of the scale. I could not leave it there, and I could not drill a new hole. Doing what I could, I drilled through it and hammered it out with a centre punch, which tore the inside and caused some delamination. Back to the belt sander.

Feeling the bitterness of defeat, I tossed aside the remaining screws of the bunch and went back to the hardware store to find a tapper (pictured above). Taking the holes slow and with plenty of cutting fluid, it went much smoother than the first attempt, and now the pieces all fit snugly together.


With the holes in place, I refitted the spring with the blade in place for an alignment check. To no surprise, it was not the same as the first time. Bending it a little more and elongating it slightly, it fit with no overlap and held the blade snugly while open without letting it overextend.

Up to this stage, I had troubles with the spring sliding to the sides as it opened, falling out of alignment. To rectify this, I removed first one then both of the nylon washers between the blade and scales at the hinge. Since this also reduced the thickness there significantly, I also had to take out one of the brass spacers. Not a  huge issue, but made it asymmetric. In the end, no problems there.


When perusing the hardware store, I imagined the head of the screw and the opposing bolt to be much thinner. No good. It is just plain ugly sticking out so far, and the original lock washers were too thick, so I made my own out of brass. Still too thick, so I removed those later also.

At the tail end, the screw heads jutted out just as far and just as painfully hideous to look at. That was fixed quickly with a saw and the belt sander. I left a little sticking out of either end and peened it down like a rived to keep it from naturally working itself free over time. In the future, I will use either solid rivets or find screws with a hex head and proper taper so it lays flat. Similarly, I will not use the conventional screws at the pivot. Ideally, I would have gone with a cutler's bolt, but there were none of the right size on hand.


After taking out the pivot screw, I began to experiment with the patina. Unlike every other piece of mokume I have worked, this one could not be separated from the steel while I did it, which meant I could not leave it unattended with acids or the like. The first round, pictured above, was a classic mixture of ammonia and salt. While it mostly worked, there were spots along the bottom screw/pins that did not patinate. In order to fix this, I put it back in the soaked towels and pressed it down with some scrap blocks of steel.

To an effect, this worked, but over the following weeks I continued to nurture it into the final state. Once out of the patina, small spots of rust began to grow on the spring and ends of the pins. I heard once that this can be corrected by boiling in water, which converts the bad red rust to a safer black. Some repetitions of boiling and drying later, and the problem was solved.

Without a proper pin, the knife sat on my desk ageing for a good many days as I hunted for a rived with a head just large enough to cover the holes for the bushing and a shank of the proper diameter.

And then the new belt sander belts arrived. Part of me was waiting for this to finish the blade, as the best one I had left was about as old as the project itself, and couldn't handle the scale negligently left on during heat treatment.

Less than an hour later, the blade was sanded smooth and true up to 800# and shaving sharp. While the edge is thinner than I would have liked, it will do. Around the same time, a few days prior, I found a rivet just right for the job. Like a miracle from the forgotten cabinets of fasteners beside the door, it fit perfectly. Trimmed to length and peened down, the fit could not be better. Only, during the process I forgot to put something between the scales to prevent them from closing too much and pinching the blade as it opens. None the less, after working it a few hundred times it is less of a struggle to open, although it is still snug.

After several long months and as many transformations, here is the finished knife, and the first folder I have made. I will not say that it was painless, but I enjoyed it and once again found myself amazed at how much I learned through the process.


Saturday, February 9, 2013

The Fate of Shattered Steel

As with all things, that which is made can be unmade by the simple ebb of time and space. Fire and water, steel and the force which ties them together share a ubiquitous relationship especially to the smith, and despite the countless times they face those things prediction is still impossible. A well hammered billet or a cold formed sheet, a drawn wire or a rolled bar, it does not matter, for every piece of steel has its own face and its own spirit. Some will be forged, others broken, but it is that transformation that keeps us coming home to face it again and again.

Before the first embers, the idle thoughts of creation stir design. Inspired by history or myth, fancy or those curious creations of others, they meet together and form anew.  Page upon page lay half forgotten or half finished, and with them all may come their time of reckoning where they either are breathed new life or discarded once again.

Many months ago, I began to sketch a design for an Ulu, meaning 'woman's knife', that comes from the beautiful lands of the Alaskan natives. This knife is the Inuit equivalent of the Germanic seax, and was used for everything from skinning animals to building their homes. While the traditional ulu differs greatly from my design, its foundation remains true in spirit.


Meant to be held with the top in the palm of the hand, it will be about 10cm  long. Of course, the Inuit blades did not have such patterns engraved into them, and that is in part where I diverge.

The steel for this particular project comes from a bar of 1084, the widest I had on hand, although it is still too narrow for the dimensions of the cutting edge. As my skill and experience develops, I learn new techniques and greater control over the red hot metal.


To begin, I kept the stock at length and began the flaring of the end with the hammer's peen. To the non-metal workers, peens are that useless end of the hammer that cannot pull out bent nails. To some smiths, it may be just as foreign. Indeed, it was to me until a relatively short time ago when I stubbornly used only the flat (slightly crowned) face to do everything. Until now.

The peen is a device by which the force of a hammer's blow is transmitted in only two directions instead of three. Of course, the downward deformation is impossible to avoid if any lateral change is desired, so that is the first. The other is the manner in which it is pushed out. A flat face moves the steel out in width and length, shortening thickness. Straight/cross/skew peens will move it only in width or length, depending on how it lands.


One cycle through the fires of creation, and the unmoulded steel begins to slowly transform into its destined shape. Little elongation accompanies the flaring at the end, and a fanlike hammering pattern brings the two corners farther apart while keeping the neck thin.


To keep the steel from becoming too thin, I upset the edge by heating it alone to a malleable orange. Steady, careful repetition of peening and upsetting brings the corners still farther  apart. The length of the piece is longer than the final ulu will be, as that needed material will be pushed into the edge and shoulder.


In order to prevent working myself into an unsavoury situation, I must also work the back end of the ulu before the cutting edge becomes too thin to hammer against. That, and as the edge takes form, it also becomes rounded. Using that edge as a brace on the anvil as I upset the opposite end will flatten it, which is one more wasted heat to correct.


Instead of keeping the palm end flat and narrow like the cutting edge, I leave it slightly mushroomed to make it more comfortable to hold during use. The neck, however, must be kept flat and taper evenly from the edge to the handle.

In traditional ulus, a piece of flat metal would join with a handle of bone, wood, or stone. Here, it is an integral blade pertly due to convenience, and partially for the practice and care of forging.


Steadily working both ends, the girth begins to widen from the continued hammering on the ends. Compared to the original stock, the flat is nearly half a centimetre wider and proportionately thicker.


Despite the flaring in the end, many of the marks from peening remain. Fortunately, there is still enough thickness remaining to hammer with the flat end to smooth and flatten it.


Due to excessive use of the peen and little experience with the technique, the corners have opened a little too far compared to the transitional radius needed between body and edge. Fortunately, a combination of the anvil's horn and half round files, such problems are trivial.


Cleaning the edges was a fairly simple and painless procedure. After fixing proportions and evening the curvature on the horn, I turned to the files to refine the lines and put a slight radius on them for heat treatment.


A quick and dirty attack on the scale and comparison to the original shows that the shape is slightly different, but for the size of the stock, pushing it farther would be needless. 

A usual heat treatment brought the blade up to non magnetic . From the forge edge quenched into warm canola oil, as the body must be soft for engraving, and then into the oven at 385 for three cycles left the edge hard and straight. And cracked.

This is not the first, nor will it be the last blade lost to heat treatment, but it is those subtle cracks that do not stop your heart with a ping as glowing steel plunges into the quench that hurt the most. It is as though the steel would rather have been something else, and sacrifices itself just when you thought it was safe to breathe again.

Because the crack is deep and runs through the better part of half its width, I will not finish it as I originally intended. It now holds as fine an edge as my worn down 320# belt can grind and sits in the kitchen against the knife block hoping for use in that odd job. 

Perhaps this is a sign that I should do this again and take better care to keep the steel whole. In the end, I learned from the process, from my mistakes, and that it is the journey that makes this craft worth practising.

Hammer on.