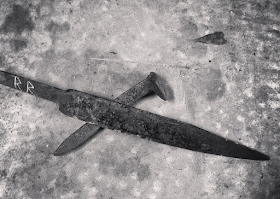
For some time now, there has been stewing in the dregs of the internet a subculture of smiths who thoroughly believe that using railroad spikes, lawnmower blades, and leaf springs make superior knives. Or at the very least, comparable to what is available in known specifications. Having never made a knife from any of that sort, I decided I had to try and see for myself.
For this project, I forged a sax-like knife from each a railroad spike and a piece of agricultural lawnmower blade. The result? For the spike, mediocre at best. At full hardness (untempered), the blade was still soft. One of the common misconceptions is that the 'HC' railroad spikes (High Carbon) are actually high carbon. No. They are not. They are higher carbon than their ordinary counterparts, but still fall laughably short at around .30% carbon, where optimally (for me) you want to be much closer to or a little higher than the eutectic ration at approximately .76% C.
Cutting another piece from the mower blade, I laminated it with two more railroad spikes. Midway through forging the first knife, I lost all power to the shop, so those first two were as forged, but before the end of the third power was restored so I cleaned it up on the belt sander and sharpened it. Overall, I was pleased with the result, a fully flat ground blade with a microbevel after etching, sharpened to a hair shaving edge.
Here are a few photos of the process, and a video I put together during the making. While I know I cannot end any debates on the time old subject, I now know where I stand on it. (and of course, you know where to find the mute button)


Loved the video and amazed at the outcome. The change after the etching adds so much character to it. With the amount of time and effort it must have taken I'd hate to know how much someone would charge for this kinda thing!
ReplyDeleteThanks for the support! It's an unfortunate fact of custom work (of any discipline) that the cost turns out to be higher than most people expect despite only making a few dollars an hour by the end of it.
DeleteHey could us list supplies/tools you used and give some pointers?
ReplyDeleteFor tools, I used
Delete-Forge (propane)
-Various hammers
-Belt sander
-McMaster Carr 11 second quench oil
-Rail spikes
-Lawn mower blade
-Borax (flux for welding)
What do you want to know? Most of it is nothing more than heat and hammer control. You do not need anything fancy or expensive, and can replace the belt sander with files if you forge close to shape. The guillotine tool that I used to neck down the tang is also not really necessary. Using the corner of the anvil's face with good hammer control does the trick just fine. For welding, the cleaner and flatter the surfaces, the easier it will be. I did not have power in the shop for the majority of the time forging, so I could not clean/flatten the steel before welding or tack weld it with the MIG welder before setting it with the hammer. Both of those things would have helped, but as shown are not necessary.
Hi very good vid, i was impressed by the temper pattern on that last blade could you describe the process a little and what kind of clay you used ?
ReplyDeletethx alot
It is actually a weld line, not a hamon. The white line between the darker edge (lawn mower blade) and the lighter upper half (rail spikes) is likely do to carbon migration and surface oxides. When etched, it for some reason really stood out. As far as I know, there is no differential hardening other than what would naturally occur because of the two different steels used.
DeleteCheers!
ok i understand thank you for your reply, i have one last question if i may as i am very interested by this technique, what causes the line to make that sharp up and down pattern just like a hamon is it hammering or bending the steel while it's hot. I really cant figure it out by looking at the picture it's beautifull as if it was done by nature itself it looks like fire, it give this blade a kind of organic look. Anyway thank you for taking time to read me and answer my questions.
DeleteFrom france
The wavy nature of the line is due mostly to deformation while hammering. There are ways to grind, cut, or otherwise intentionally deform the steel layers before forging back to flat, but usually that is only done with higher layer billets (to create things like ladder patterns, raindrop, feather, etc.) and often result in a more 'predictable' pattern. Using a press helps or power hammer keeps the layers relatively in line with one another, so after grinding it will be much more crisp. Hand hammering is where the variation comes in, especially if the bevels are forged in, like in this blade. By using hammers with smaller faces, the variation will generally be greater. Hope this helps!
DeleteThank you again for this precious information i think i understand better, by the way i love your blog i will come often.
Delete