Chasing, engraving, and inlay, as techniques applied to metalwork, for a long while have given me great hesitation to begin learning due to their demand for precise tools and the diminutive scale of the work. Earlier this year, a good friend of mine showed me how he approaches fine wire inlay and, as with a surprising number of things, once you understand it many of the mysteries and reservations disappear.
As with anything, the tools come first. For my approach to inlay, I needed to make a few simple chisels, gravers, and planishers. All out of ,25" square O1 tool steel, ordinarily I would have forged them but in absence of a shop they were all ground to shape.
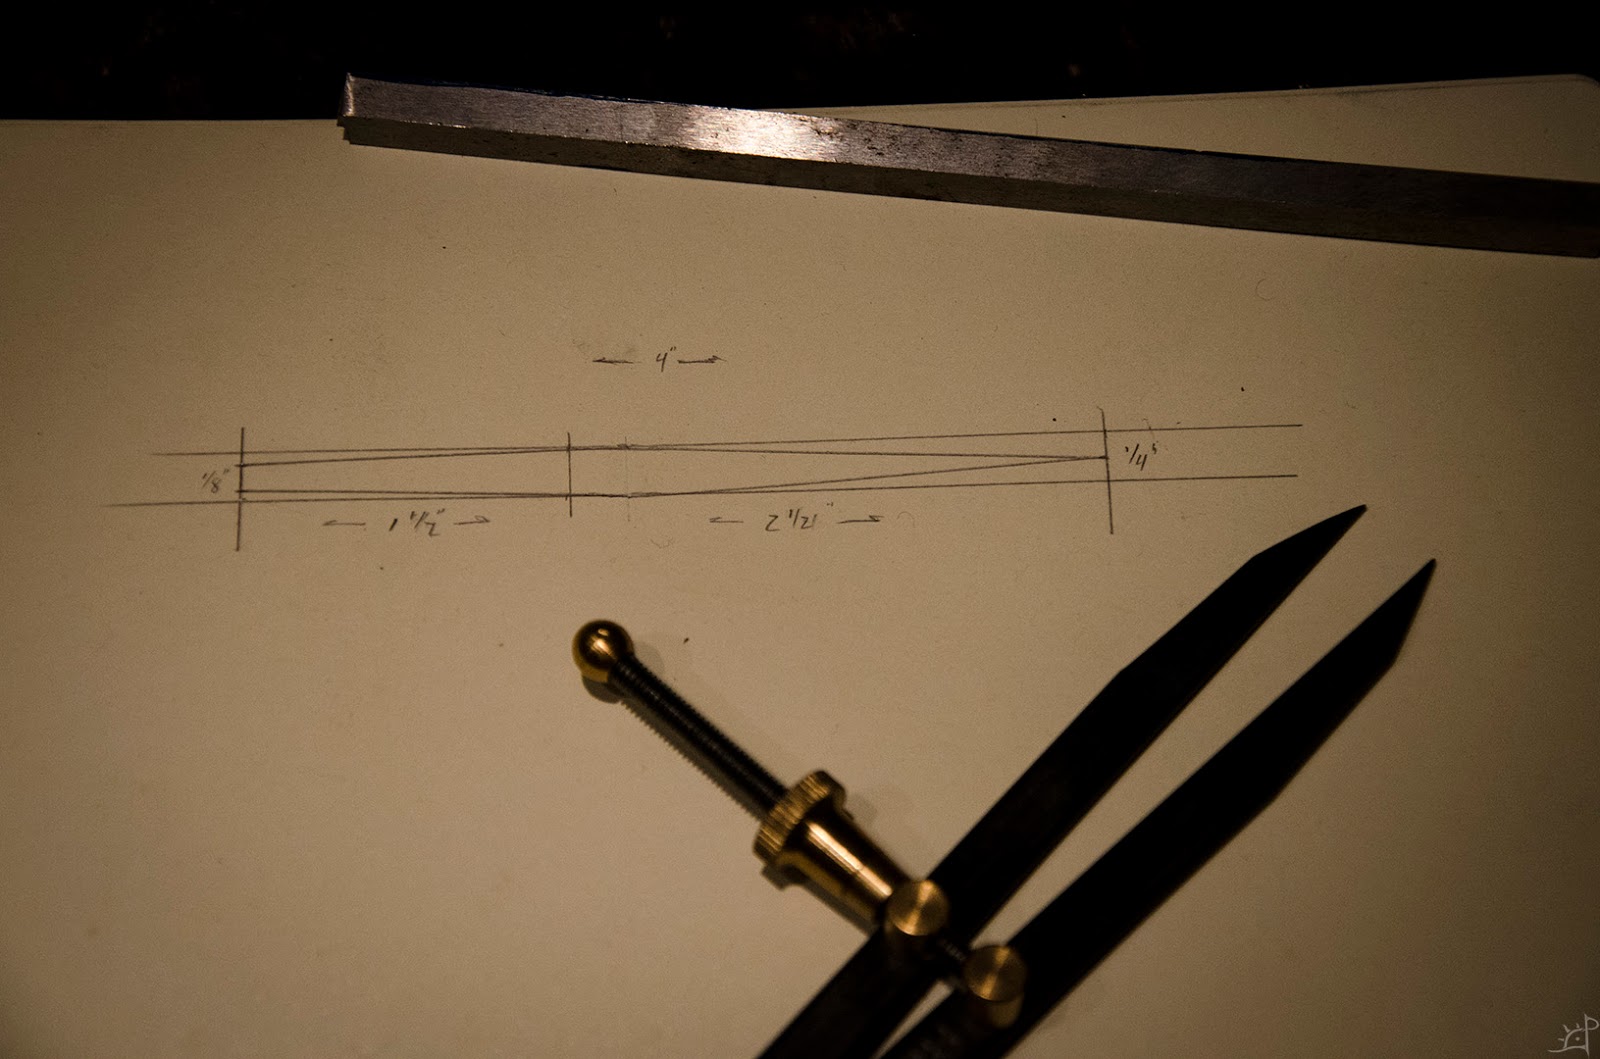
The dimensions were a bit arbitrary and trial and error, the only really important part being the edge geometry. Overall, they are 4" long with a gradual taper on one end to 1/8" over 1,5" to the original thickness, then again tapering to a point in the other end over the remaining 2,5".
From left to right, there is a graver, which actually chisels out the material you are inlaying into, leaving a small groove cut into the surface. Then there is a chisel with a steeper angle which I use to undercut the groove, turning its geometry into a slight trapezoid rather than a rectangle. Next is a square faced chisel that I did not use much, but is helpful in smoothing out the bottom of the groove and scraping off the paper of the pattern. Finally, a polished round faced punch that drives the wire into the groove, spreading it into the channel and expanding it so it locks into place.
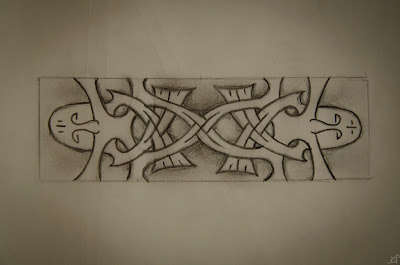
Next up, you need a pattern of something to engrave. Above is the sketch of the design, fitted to the shape of the sanding block whose face I am about to inlay. Tight turns and intersections at odd angles are a little more difficult, as well as small areas of relief, but with a careful hand it is certainly possible. This project is the first thing I have ever engraved and inlayed, so it will hopefully give you and idea of the learning curve (which, once you get the feel for it, is not that steep to produce a passable result).

Now, transfer the design to the thing to be inlayed. I first tried sketching directly on the metal's surface, but it did not work as I expected, so I re-sketched the pattern onto another piece of paper and adhered it to the steel. This was more helpful than I expected, giving the graver a softer surface to bite into before beginning to cut the steel. I forgot to take a picture of the piece without any work on it, so here's what a piece of the un-engraved surface looked like.

Onto the actual engraving. I started each cut by holding the graver almost straight up and down, hammering lightly to establish a cut by which to begin the channel. Everything in this process is done with light hands. My chasing hammer is only 4oz, and there is never any real 'swinging' involved. More, it is the falling weight of the hammer with a slight flick of the wrist. Once the cut is established, I lower the angle of the chisel slightly and continue to tap with the hammer, forming a chip as the graver cuts the metal. I should note here that it is important to anneal whatever you are working on so you can actually cut through it. This block is mild steel, and although the tools are hardened to about 58 Rockwell C, the softer the surface the better.
As the channel is cut, maintain an angle on the graver that allows it to move forward without either driving deeper into the surface or coming up and breaking out the chip. It takes a little of practise to feel what is right, and being able to maintain a proper angle. As for the depth of the channel, I cut only about ,5mm deep or so, which is deep enough to easily catch with a fingernail but not so deep that the wire to later be inlayed (I am using 20ga sliver) disappears beneath the surface of the engraved face.
Finally, at the end of each line, cut straight down on the terminus to form a square corner instead of an upswept slope. Then, come back as though you are going to continue cutting the groove but at a steep angle so the end of the lines are all undercut.
Once all the lines are engraved, come back with the wider chisel with a steeper angle (or if you are really in a pinch, you can use the same graver as what cut the grooves, but I find the face to be too narrow) undercut the groove at a very slight angle. This cuts down into the corner of the channel and raises the edge up slightly to form a trapezoid shaped channel. Doing this is what allows the inlay to stay in place, and too shallow or steep of an angle will cause the wire to fall out.
With everything cut and undercut, it's time to bring in the wire. A fully annealed wire is important, as any firmness to it will make this process difficult and unpredictable. Originally, I experimented with bronze that I thought was fully annealed but turned out to be half hard and as a result was completely unsuccessful. After annealing, it was much easier to work with and overall successful.
To begin insetting the wire, take a squarely cut end and press it down into the channel, holding it there with the polished punch. A light tap forces it down into the groove, but too hard and the wire bends a into a corner which may cause the inset bit to come out when you begin setting the remainder of the length.
Once the end is firmly in place, work the punch across the length of the groove using overlapping blows. I tend to use several passes of light taps to set the wire down, and once it feels set into place, I return to the start and use heavier blows to force the wire as far into the groove as possible. Then, using overlapping blows again, work forward to lock everything into place. Using repeated passes of heavier blows causes the wire to expand forward more than you might think, and can cause it to unseat from the groove.
It should go without saying, but bend the wire to the shape of the line you are following.
When determining how long to cut the wire, I tend to work in sections a few inches long, leaving it connected until the last possible moment. This prevents cutting too long or too short for the line being inlayed, and prevents me from needing to worry about how much a particular length will expand. For smaller lengths like the marks on the forehead of the engraved face, I cut pieces just a hair short and inlayed them without the remainder of the wire attached.
When approaching sharp corners, I use two separate pieces instead of trying to work the wire around the bend.
Notice how the wire expands over the edges of the engraved groove and makes the lines thicker. There are techniques for raised wire inlay which this is addressed, but for this method, the lines will all return to their original width. As a result, they will be sharper like on the left of the above picture which has not yet been inlayed.
Once the entire face is inlayed, here with sliver and a copper X in the centre, it is time to bring the surface down to a plane again. I could have done this in the pitch pot as well, but I did not want to foul the pitch with silver and copper filings.
Unsure of how firm the wire is set in the face, I did not want to use the belt sander to make the face flush again. Also, this is more controllable and does not risk grinding through the inlay entirely.
Light draw filing removes any unevenness from the insetting, revealing the character of what the final design will be. If that is the look you desire, you can stop there, but the wire is still proud of the face. So I continued to file down until even again.
The original surface was both hot and cold blued, making one of the blackest patinas I have ever done. I thought it would be a good contrast to the silver, so I went back with the cold bluing oil to darken the places in the steel touched by the file.
A quick coat of Renaissance wax to stay off rust, and it is done. For a first project and experimental approach to similar techniques, I am quite satisfied with the result. Since this sort of thing better lends itself to explanation through demonstration rather than pictures and words, I will update this to explain and answer whatever questions might arise.