A few years back, I journeyed down the road towards binding books by hand, and although the result was I suppose successful the entire experience was not wholly satisfactory. Due to the thickness of the spine and general inexperience, there were a few pieces to the method that I wanted to change, and now I have come to a project which allowed me to explore these differences. In the interest of pursuing more traditional methods and materials, this time I used a few particulars which, although not necessary, will hopefully add a note of authenticity in appreciation for the approach.
For this round of binding, resulting in a sketchbook, I used the following materials:
-Linen paper
-Cotton thread
-Linen tape (ribbon)
-Mull
-Hide glue
-Leather
To being, I took the linen paper and oriented it so the texture all aligned to the same direction. This was for nothing more than consistency throughout the process. With a stack of somewhere around 200 sheets, I began to fold them in half and make stacks of 5 sheets, resulting in folios of 20 sides each.
Five of the original sheets seemed to be a good number for the thickness of the folios at the fold, allowing the edges on the opposite side to have the look and feel of depth to them without the farthest (innermost in the folio) protrude excessively far from the shortest (outermost in the folio).
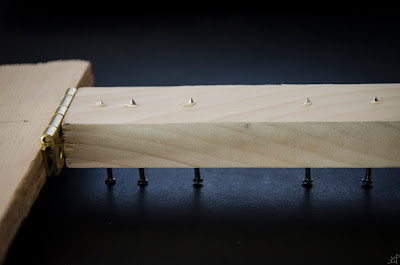
Here is where I spent a great deal of time deliberating on what to do next. For a few weeks I thought over how to punch eight holes in each of the hundreds of sheets with exacting consistency. Doing them all by hand, separately, would take far too long and be far too inconsistent to make the stitching of the spine come out with any amount of respectability. In the end, this is what I came up with. In short, it is two boards connected by a hinge, the top of the two with eight nails driven through it. When the folio is inserted into the jig and the top board pressed down, the tips of the nails punch through the paper.
For an idea of how far the nails come out, see above. It is not much. Had I smaller nails, I might have used those, but after a lot of trial and error, this depth was the best for puncture consistency, hole size, and not having the nails sink into the opposing board too far. The advantages I have found using this jig are this. First, the hinge itself has several lines which can be used to align the centre (where it was folded) of each folio. More, it is also a hard stop for how far the folio is inserted into the jig. After getting a feel for it, I marked a few lines on the non hinge size of the bottom board to align the crease of the folio. In the beginning, I expected to have to punch the folios one sheet at a time, but after adjusting the depth of the nails, I was able to easily and cleanly (important) punch all five sheets at once. As a result, I punched a few thousand holes in just about a minute, all with perfect accuracy and repeatability. The spacing of the nails was measured such that the folios can be inserted in either direction and the hole spacing will remain the same, but this is also unique for this length of paper. Should I bind other sizes of folio, I will need to make another top board for the jig.
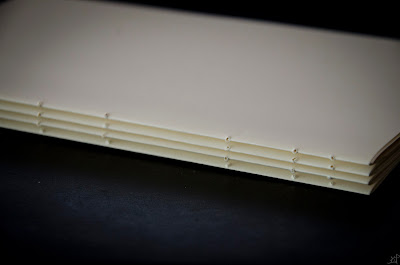
The bottom folio of the above stack of paper is a bit off kilter and was one of the ones used in testing out position, but after learning the tool, the nails fell centre in the fold every time. This will make stitching the folios together incredibly easy and predictable.
With the stack of folios punched for stitching, it's time to gather everything for the actual binding. Simply put, all you really need is thread. The linen tape helps keep the folios aligned and straight, but it is not strictly necessary.
With the linen in place, it is a bit easier to see the reason behind how I spaced the holes. There are two on the ends that tie the folios together, then three pairs of two which are spaced at the width of the linen.
The end of the thread receives a barrel knot, an overhand knot, or really any simple stopper knot to keep it temporarily from pulling through the first set of holes. This knot will later hold another knot on the second folio and affix the two together, which will be explained later.
To begin the stitching, first start on the outside of the spine and push the needle into the first hole at either end. I happened to start on the left side but there is no difference. Then, simply follow the hole pattern going in and out to either side, trapping the linen tape when you reach those sets of holes as shown above. It is important for a tight binding to pull the thread tight through each of the holes. When doing this, pull only in a line parallel to the folds, or the thread will very quickly cut through the pages.
This is what the inside of the first stitched folio looks like. To hold the folios in place, I use a metal straight edge or anything flat with a little bit of weight to it. Open the folio and set it on the stack such that the inside of the folds are accessible.
Now we come to the second folio. Because of the number of holes, the thread will be coming out of the first folio at the spine as shown above. Just like with the initial threading, pass the needle into the second folio from the outside towards the inside of the fold.
This next bit may be a little confusing at first but is actually quite simple. When the thread comes out of the second hole, the an overhand knot that captures the thread of the first folio that holds the linen tape in place. The reason for this is to keep the folios tight together at the middle of the pages as well as the ends, which are naturally held together by the thread direction. If you do not do this, the binding will still work, but the linen tape will be the thing keeping it together rather than the thread. With the subsequent hide glue over the spine, it is possible to do without the binding knots, but I would advise using it as the glue is strictly a chemical binding rather than a physical one, and can fail after repeated opening and closing of the book.
Once the knot is tied, continue the threading as normal, repeating this knot every time the needle comes out of the spine (one for each of the linen tapes).
At the far end of the second folio, tie another overhand knot, this time capturing the stopper knot at the original end of the thread. This pulls the two spines of the folios tight together.
Onto the third folio, now everything becomes repeated through to the last folio. The only difference between this one and the second folio is that the end knot simply passes between the two folios beneath it, again cinching the folios tight together.
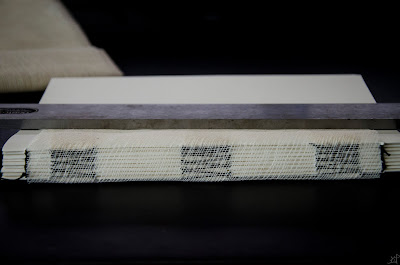
Finally, the stitching is complete. Notice how the stitches across the linen forms a Z pattern. This is because the thread comes out of the spine on alternating sides of the linen and thus which side receives the knot. Hopefully that makes sense.
Thread complete, it's time for the mull. This is in essence a very loose weave fabric that adds some structure to the spine. it helps act as a surface which the glue adheres to, allowing for a stronger binding between the cover and the pages.
I decided to use hide glue, although any white PVA glue will also work. Since this is the first time I have ever used hide glue, I cannot comment on the durability of it, but the PVA glues I have used in the past are excellent. Hide glue burns under direct heat, so it must be heated either in an electric glue pot or in a simple double boiler. I went for the latter.
Cut the mull so it extends past the linen tape and covers the majority of the spine. I left a it a tad short of the edges for aesthetic reasons, as I did not want the chance that it would later be visible once the cover is on.
Apply glue to the spine only at this point. Glue over the mull and press it down so that it becomes entrapped in the glue layer. Try to avoid excess glue from dripping or spilling over to the front and back of the pages.
Next, take some waterproof layer such as tin foil or wax paper and place it between the pages and the mull/linen tape.
Between the foil and mull/linen, place a half sheet of paper or whatever size page you are binding with. Align the loose sheet with the bound pages as closely as possible, as this will serve as the interior cover of the book.
Place the pages on whatever you are using as a cover, in my case ~2oz leather. Brush on a layer of glue on both the leather and the loose sheet of paper, leaving a clear space where the spine of the bound pages will sit. This is one of the lessons I learned from my previous experiences with binding. Having the cover attached to the spine makes it difficult to bind the cover to the front and back while having it still be able to open fully.
With everything aligned, fold the cover onto the pages and apply even pressure while it dries. I used a granite block with another weight on top. Having a flat surface pressing down while it dries is important to keep the pages from drying strangely, and the foil barrier keeps the moisture of the glue from the pages beneath.
Once the first side is done, flip it over and do the same thing on the second side. Pull the cover material tight before gluing or there will be excess leather over the spine.
When the glue is dry, which takes a bit longer because of the leather and foil preventing moisture from evaporating, remove the weight and trim away the excess cover material. Later, I will be adding some embellishment and a touchmark to the the sketchbook, but for all practical purposes, the book is now bound.
Cheers!


